Openstack / Windows image build
- 0 comments
This tutorial has been developed in an effort to assist OpenStack adopters more quickly migrate systems and applications into the cloud. This entry provides the foundation for building Windows images for Openstack, the default HyperVisor in OpenStack with an overview on how to build custom images for use and deployment with KVM and ultimately deployable to OpenStack. If you are interested in finding out more, send us an email for access to our highly secure Cloud / OpenStack environment; where you can see a list of our growing library of supported images including Windows 8.X, MS Server 2012, Linux, Windows 7.
Building a Windows Image for OpenStack : Here is a how-to for building a Windows image to import into OpenStack or a KVM Hypervisor. We need to sysprep the image before we can import it into Glance.
Prerequisite
- KVM is already up and running properly. (I prefer to build these on separate Ubuntu laptop see link for setup your laptop)
- You have a copy of the Windows System ISO. (Tested on Win7, Win8.1, Win 2008 Server & Win 2012 Servers)
- You have the Windows License available.
- DO NOT install cloudbase-init, you will download these in final step.
- Download the iso disk image of the
Virtio Drivers
http://alt.fedoraproject.org/pub/alt/virtio-win/latest/images/
Install Windows Server 2008 R2
For this example I will use Windows 2008 R2, The following steps should help you install Windows Server 2008 R2 and upload it into glance for use with OpenStack.
Create Windows Server 2008 R2 Hard Drive
You will first be required to create a target hard drive to install the Windows Server 2008 R2 Operating System on.
    $ cd ~ && mkdir KVM && cd KVM (if you have a external hard drive you can also mount that and create the the KVM folder there. this will make it easy to upload to Glance)

    $ qemu-img create -f qcow2 WIN2K8R2.qcow2 20G
Attach ISO and boot
Next we will attach the Windows Server 2008 R2 ISO and boot
$ qemu-system-x86_64 --enable-kvm -m 2048 -boot d -drive file=WIN2K8R2.qcow2,if=virtio -cdrom Win2K8X64R2Ent.iso -drive file=virtio-win-0.1-xx.iso,media=cdrom -net nic,model=virtio -net user

Note: You *must* ensure you tell it to use the **virtio** drivers, also please use correct name for -cddrom = full name of ISO and replace xx with version of latest virtio-win ISO.
Load Drivers & Install Operating System
- Click Install
- Select your Operating System type
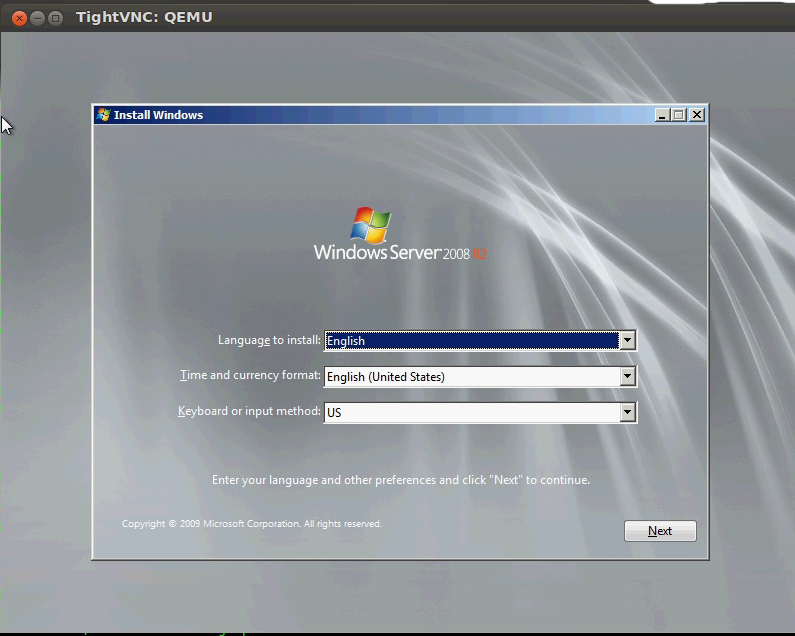
- Accept License Terms
- Select Custom Installation
- Click ‘Load Driver’
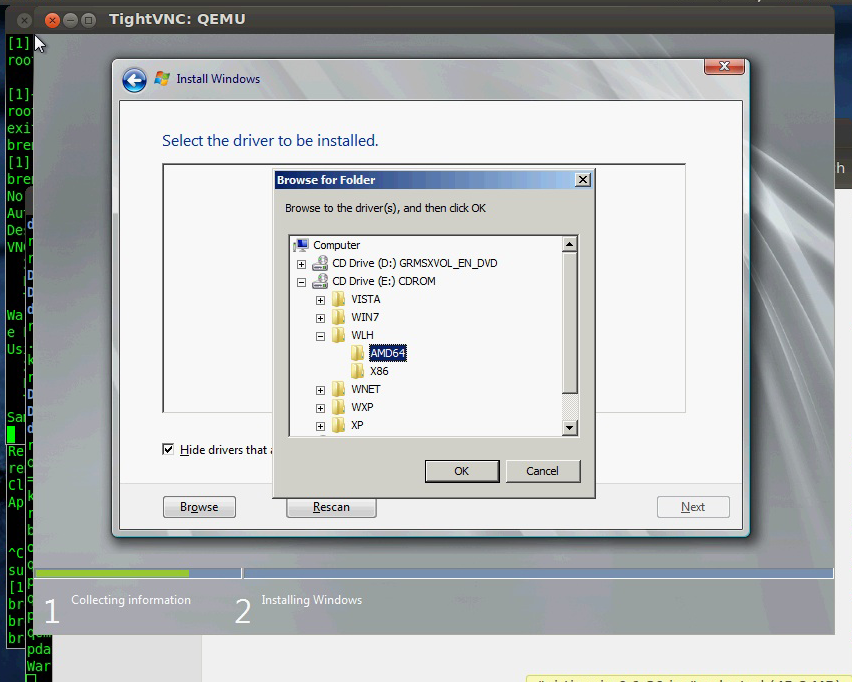
- Click Browse
- Navigate to the cdrom ‘Virtio Drivers’ You should see two cdroms attached. One is the install cdrom and the other the ‘Virtio Drivers’
- Select ‘Virtio Drivers’ => STORAGE => SERVER2008R2 => AMD64
- Click OK
- The ‘Red Hat VirtIO SCSI controller’ driver
should be highlighted. If not then you have done something wrong.
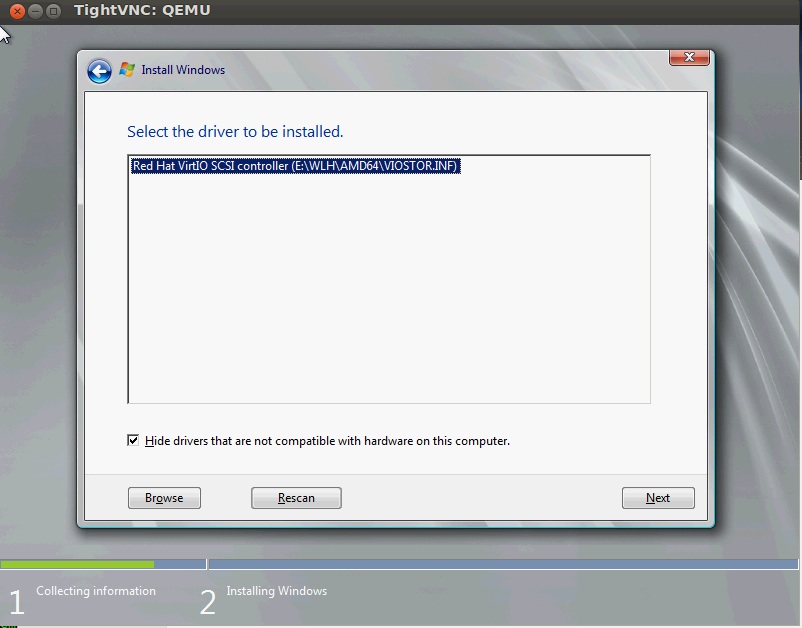
- Click Next Driver should load without error and take you back to the screen to select the hard drive to install the Operating System on
- Click ‘Drive options’
- Click ‘New’ Ensure the entire drive space is being used – in our case the entire 20G
- Click ‘Apply’
- Click ‘OK’
- Click ‘Next’ The Operating System will install. This process may take awhile depending on resources you gave initially. Be patient.
- Once completed you should be prompted to changed the Administrator password. Do so now.
- The install should be completed and log you in! Congrats.
Set your Date and Time
You should probably go ahead and set your Date and Time
- From the ‘Initial Configuration Tasks’ screen
- Click ‘Set time zone’
- From the ‘Date and Time’ window Click ‘Change time zone…’
- From the ‘Time zone:’ drop-down select your time zone.
- Click ‘OK’
- Click ‘OK’
Install Additional Drivers
Under Computer Management -> Device Manager update the drivers to the RedHat Ethernet Adaptor on the virtio ISO mounted.
Configure the Firewall
Either disable the firewalls or open TCP 3389 and allow ICMP to test your image. RDC is the only way to reach the host for initial setup.
Shutdown
At this point you will want to shutdown the virtual machine. Go ahead and do so .
Importing into Glance
There are many ways to do this, my 2 favorite ways are to SCP the image to glance server, (very long time for 20G image) or if your image is on external drive and you have access to your glance server, mount the external drive and move the image. For this exercise i did a SCP copy to Glance home directory and ran this command
-
# glance image-create --name "Window Server 2008 R2" --is-public=true --disk-format=qcow2 --container-format=ovf --file WIN2K8R2.qcow2
Please don’t forget to add security rules for 3389 and ICMP in OpenStack, and depending on your build you may need to add a floating IP to the instance and the RDC into the host.
Now the final step to create a custom image in Glance
- Create an instance (INITIAL) based on the image. Your goal here is to get Windows to boot up and running on OpenStack emulated hardware. During this phase Windows will adjust itself to perfectly fit the OpenStack emulated hardware.
- Finish updating/customizing your instance in OpenStack, because running these updates and custom stuff will decrease your free space on 20G.
- Shut down the instance and TAKE A SNAPSHOT (let’s call it the PREP snapshot)
- At this point you don’t need the INITIAL image or the instance you created from it. You can delete both.
- Launch a new instance from the PREP snapshot. Notice how Windows doesn’t need to do all the hardware adjustments that it did when you launched an instance from the INITIAL image.
- You can now install cloudbase-init. (download from link above)
- Shut down the system and TAKE A SNAPSHOT (let’s call it the Win2008IMAGE snapshot).
- Test your Win2008IMAGE snapshot by launching an instance from it.
- Mark the Win2008IMAGE snapshot as public and celebrate!
Please let me know how your install went and if you have any questions or comments.
Thank You
Tomasz
J
ExColo LLC
info@excolollc.com